

This post was initially published here by Nils Fuerste and is reposted here with permission.
In this post, I focus on setting up the Sylva workload cluster on the bare-metal node as the next step in the lab setup.
My goal is to understand how the management cluster provisions and operates a downstream cluster in a Sylva setup. In the previous post, the focus was on bootstrapping the management cluster. Here, the management cluster is already running and is used to provision the workload cluster on the a physical server through CAPM3 and Metal3.
Lab Setup
The lab remains the same as in the previous post:
- one management VM hosting the nested control-plane VM for the management cluster
- one control-plane VM provisioned via CAPM3 for the management cluster
- one physical Advantech server used as the workload cluster node
In this post, the focus shifts from the nested management-cluster node to the physical bare-metal server. The management cluster is already up and running and now acts as the provisioning and lifecycle-management point for the workload cluster.
Topology
The topology is the same as before, but the provisioning path changes.
For the management cluster, the bootstrap VM initially interacted with the virtual Redfish BMC exposed by srs-sylva-mgmt through sushy-tools in order to provision the sylva-cp VM.
For the workload cluster, the management cluster now interacts directly with the Redfish BMC of the workload server. In this setup, the target node is srs-advantech, with BMC access through 10.12.1.142. The bootstrap VM is still used to run the Sylva apply scripts and provide the local environment configuration, but the actual provisioning is handled by the management cluster controllers after pivot.
The following values are relevant for the workload cluster in this setup:
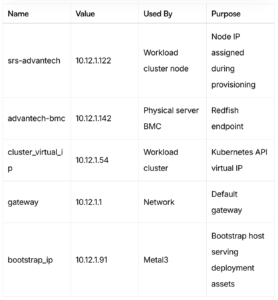
The important distinction here is that 10.12.1.54 is the workload cluster virtual IP, while 10.12.1.122 is the actual IP assigned to the single bare-metal node from the configured CAPM3 range.
Prerequisites
Before deploying the workload cluster, the Sylva management cluster must already be up and healthy. You also need the management cluster kubeconfig available on the bootstrap VM.
This kubeconfig can be extracted from the management-cluster node. SSH into the management node and copy the RKE2 kubeconfig, substituting the loopback address with the management cluster VIP:
ssh sylva-user@10.12.1.40 'sudo cat /etc/rancher/rke2/rke2.yaml' \
  | sed 's/127.0.0.1/10.12.1.137/' \
  > ~/sylva-core/management-cluster-kubeconfig
Verify it works before proceeding:
kubectl --kubeconfig ~/sylva-core/management-cluster-kubeconfig get nodesYou should see the management control-plane node in Ready state. This kubeconfig is then used by the workload cluster apply process.
Create Environment Config
In this section, I show how I configured the workload-cluster environment. The examples use the IP addresses and host details from my setup, so make sure to replace them with values that match your own environment.
As in the previous post, all cluster-specific configuration lives under environment-values/.
For the workload cluster, I use the following environment:
environment-values/workload-clusters/ocudu-rke2-capm3/
The workflow stays consistent with the management-cluster setup: prepare the environment files, adjust values.yaml and secrets.yaml, and then run the corresponding apply script. The difference is that this environment is applied to the already running management cluster instead of being used for bootstrap.
Cluster Configuration
This section defines the cluster-level settings and providers used for provisioning the workload cluster.
cluster_virtual_ip: 10.12.1.54

cluster:
  capi_providers:
    infra_provider: capm3
    bootstrap_provider: cabpr

control_plane_replicas: 1
In my setup:
cluster_virtual_ipdefines the virtual IP of the workload cluster Kubernetes APIinfra_provider: capm3configures Metal3 as the infrastructure providerbootstrap_provider: cabpruses RKE2 for bootstrapping the nodecontrol_plane_replicasis set to1since this is a single-node workload cluster
This follows the same general pattern as the management-cluster environment, but now the cluster being defined is a downstream workload cluster rather than the management cluster itself.
BareMetalHost Configuration
The first step is defining the physical workload-cluster node as a BareMetalHost:
baremetal_hosts:
  srs-advantech:
    bmh_metadata:
      labels:
        cluster-role: control-plane
    bmh_spec:
      description: srs-advantech workload cluster control-plane
      bmc:
        address: redfish-virtualmedia://10.12.1.142/redfish/v1/Systems/0
        disableCertificateVerification: true
      bootMACAddress: 74:fe:48:ba:8c:5b
      bootMode: UEFI
      rootDeviceHints:
        deviceName: /dev/nvme0n1
    interface_mappings:
      enp2s0:
        mac_address: 74:fe:48:ba:8c:5b
The important parts here:
- the BMC address points to the real Redfish endpoint of the workload server
- the boot MAC must match the MAC of the interface used for provisioning
- the boot mode is set to
UEFI - the root device is
/dev/nvme0n1, since this host installs to the NVMe device
- the host is labeled as
control-planebecause this is a single-node control-plane-only workload cluster
This is the point where the workload server is introduced into Metal3.
From there on, it is handled as a managed bare-metal node in the workload-cluster lifecycle.
RKE2 User Configuration
As in the management-cluster setup, I configure an initial user for the node using additionalUserData.
This is passed as cloud-init user data and applied during provisioning.
rke2:
  additionalUserData:
    config:
      #cloud-config
      users:
        - name: sylva-user
          groups: users,sylva-ops
          sudo: ALL=(ALL) NOPASSWD:ALL
          shell: /bin/bash
          lock_passwd: false
          passwd: "<generated-password-hash>"
          ssh_authorized_keys:
            - <your-ssh-public-key>
This creates a user on the workload-cluster node during provisioning:
sylva-useris added with passwordless sudo- SSH access is enabled using the configured public key
- the password must be provided as a hashed value
This allows access to the node immediately after provisioning without requiring additional manual setup. The structure is the same as in the management-cluster environment, which keeps both environments consistent.
CAPM3 Network Configuration
This section defines the OS image and the provisioning network used by CAPM3 for the workload cluster.
capm3:
  os_image_selector:
    os: ubuntu
    hardened: true
  networks:
    primary:
      subnet: 10.12.1.0/24
      gateway: 10.12.1.1
      start: 10.12.1.122
      end: 10.12.1.122
  dns_servers:
    - 1.2.3.4
    - 8.8.8.8
In my setup:
- the OS image is Ubuntu with the hardened profile enabled
- the provisioning network is part of the same L2 network as the rest of the lab
- the IP range is fixed to a single address,
10.12.1.122 - DNS servers are defined explicitly
The important point here is that the node IP is assigned from this CAPM3 range, while the cluster API itself is exposed through the separate cluster_virtual_ip. Because this is a single-node workload cluster, the start and end of the range are identical, which effectively pins the node IP to a single address.
Control-Plane Network Mapping
This section binds the control-plane configuration to the BareMetalHost and defines which interface is used.
control_plane:
  capm3:
    hostSelector:
      matchLabels:
        cluster-role: control-plane
    networks:
      primary:
        interface: enp2s0

network_interfaces:
    enp2s0:
      type: phy
In my setup:
- the
hostSelectormatches the label defined on theBareMetalHost - this ensures the
srs-advantechnode is selected as the control-plane interface: enp2s0defines which interface is used for the primary network- the interface is declared as
physince this is a physical interface on the bare-metal server
As with the management-cluster environment, the interface name must match what is present inside the installed node, otherwise provisioning will fail.
BareMetalHost Defaults
This section defines default settings applied to BareMetalHost resources unless overridden.
baremetal_host_default:
  bmh_spec:
    externallyProvisioned: false
    bmc:
      disableCertificateVerification: true
    bootMode: UEFI
    rootDeviceHints:
      deviceName: /dev/nvme0n1
In my setup:
externallyProvisioned: falseensures the node is provisioned by Metal3- certificate verification for the BMC is disabled
- the default boot mode is set to
UEFI - the default root device is
/dev/nvme0n1
These defaults already match the requirements of the physical workload node, so unlike the management-cluster VM case, there is no need to override them for a virtual disk or legacy boot mode.
Storage and Global Settings
This section configures storage, bootstrap access, and some global settings.
units:
  longhorn:
    enabled: false
  local-path-provisioner:
    enabled: true

metal3:
  bootstrap_ip: 10.12.1.91

proxies:
  http_proxy: ""
  https_proxy: ""
  no_proxy: ""

ntp:
  enabled: false
In my setup:
- Longhorn is disabled and replaced with
local-path-provisioner - this keeps the storage setup simple for a single-node lab cluster
bootstrap_ippoints to the bootstrap VM- proxy settings are empty since the lab has direct internet access
- NTP is disabled
Using local-path-provisioner avoids the overhead of a distributed storage system, which is not needed for this setup.
Secrets Configuration
The BMC credentials for the physical node are stored in secrets.yaml:
cluster:
  baremetal_hosts:
    srs-advantech:
      credentials:
        username: administrator
        password: "<your-bmc-password>"
This is required because, unlike the virtual BMC provided by sushy-tools in the management-cluster setup, the physical Redfish BMC requires real authentication credentials. The BMC passwords for the baremetal_hosts are stored in plaintext, unlike the passwords for the management host I used in the last post.
Verify the BMC
Before deploying the workload cluster, it is worth verifying that the BMC is reachable and that the Redfish system ID and MAC address match the values used in the configuration.
To check the power state and basic system information:
curl -sk -u administrator:<password> https://10.12.1.142/redfish/v1/Systems/0 | python3 -m json.tool | grep -E 'PowerState|HostName'
To inspect the Ethernet interfaces and confirm the boot MAC:
curl -sk -u administrator:<password> https://10.12.1.142/redfish/v1/Systems/0/EthernetInterfaces/ | python3 -m json.tool
This is not strictly required by Sylva, but it helps catch wrong system IDs, invalid credentials, or a mismatched boot interface before provisioning starts.
Deployment
After the workload-cluster environment is configured, I deploy it from the bootstrap VM.
cd sylva-core
./apply-workload-cluster.sh environment-values/workload-clusters/ocudu-rke2-capm3
This applies the workload-cluster definition to the management cluster. From there, the management cluster controllers reconcile the resources, interact with the Advantech BMC over Redfish, and provision the node through Metal3 and CAPM3. This is consistent with the Sylva workflow, where the management cluster handles the lifecycle of downstream workload clusters.
In contrast to the management-cluster bootstrap, there is no new kind bootstrap cluster involved here. The management cluster is already the active control point and remains in place throughout the workload-cluster deployment.
Verify that the cluster is up and healthy:
ssh sylva-user@10.12.1.122
export KUBECONFIG=/etc/rancher/rke2/rke2.yaml
alias k='sudo /var/lib/rancher/rke2/bin/kubectl'
k get nodes
k get pods -A
Post-Deployment Note
Since this is a single-node workload cluster, the only node is also the control-plane node.
As usual in Kubernetes, the control-plane node is tainted, so workloads will not schedule on it unless that taint is removed manually. For a lab setup, it is often useful to remove it:
export KUBECONFIG=/etc/rancher/rke2/rke2.yaml
alias k='sudo /var/lib/rancher/rke2/bin/kubectl'
k taint nodes ocudu-rke2-capm3-srs-advantech node-role.kubernetes.io/control-plane:NoSchedule-
This is fine for testing, but it is obviously not the intended layout for a larger or production cluster.
Next Step
In the next step, I will validate the workload cluster and start shaping it for actual RAN deployments. The focus will be on node-level tuning, CPU isolation, and kubelet adjustments to better align with telco workload requirements. I will also take a closer look at Sylva Units and walk through a few concrete configuration examples.